Animating Stable Diffusion txt2img Outputs with Deforum and Vision of Chaos
If the newness and wow factor of A.I. image generators and Stable Diffusion has worn off for you, deforum animations may be just what you need – While we may not yet be at the point we can scare audiences like the Lumières did with their train video and are probably more in the Magic Lantern stage of development, I had a ton of fun generating the animations for this article.
Deforum Stable Diffusion
Deforum somehow creates animations by creating frames that take their ancestors into account. I do not understand this process at all and haven’t seen a ton of information on it. I will update this if I learn more. It looks to be based on this repo and the papers it links to.
There’s a few ways you can run Deforum SD. As of writing this, Deforum is not available in the Automatic111 repository used in most articles on this site.
I’m sure there’s other methods too, but this is what I’ve primarily seen people using. We’ll be using Visions of Chaos here which is easy to setup and can run on your own hardware.
Resources and Help
I’ll share some tips around workflows I learned doing some testing, but the best resource I have found to explain the plethora of options in Deforum is Deforum Stable Diffusion Settings. If you’re getting weird results or don’t understand what an option is, check this guide.
There’s also this Google Doc that may be useful.
Check here for other resources and a link the the official Discord server for even more help.
Visions of Chaos
If you’ve heard of VOC, it’s probably as a fractal/generative art making program. They have recently spent a lot of time putting diffusion models in the application and it is awesome and super easy to use. I especially find it useful swapping between post processing tools and models. It’s an awesome piece of software and you should definitely check out what else it can do with its other (non machine learning) modes.
As I write this, I got an update notification they released the Automatic111 webui to VOC. If they keep that up to date reasonably, I will probably switch over to that for ease of use.
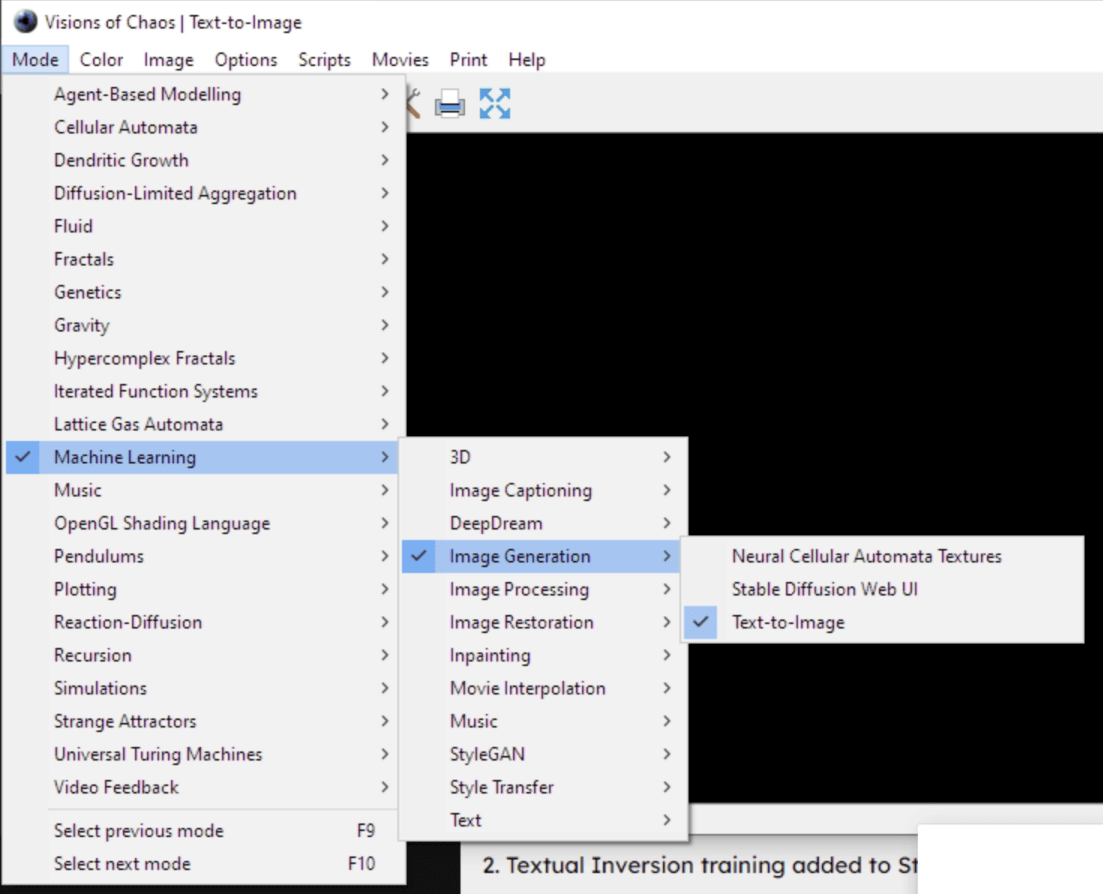
You need to enable machine learning in settings and by following this guide to use the SD and other AI features.
Once you do that, you just need to select text to image from the menu:
Then under Script, select Deforum Stable Diffusion v0.4 and you’re ready to go.
Getting Started
The settings are a little confusing to navigate. I won’t walk through everything here but here’s a quick walkthrough to get started.
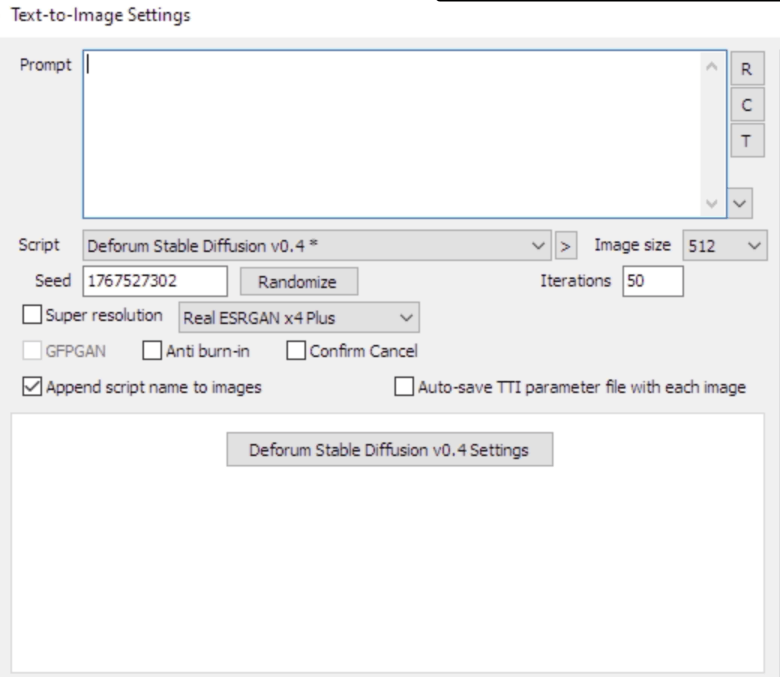
Prompt - The prompt screen here is not used in animation mode. Use this if you want to test seeds/images when building your animation prompt
Super Resolution - Use this to upscale your images. This will apply to all animation frames if checked.
Iterations - This applies to all frames but you will notice many frames will not take this many steps, assumedly due to how the model works.
Auto save TTI parameter file - I have not used this but if you want to share / recreate your videos, select this to auto save all params.
All other relevant settings are in Deforum Stable Diffusion v0.4 Settings
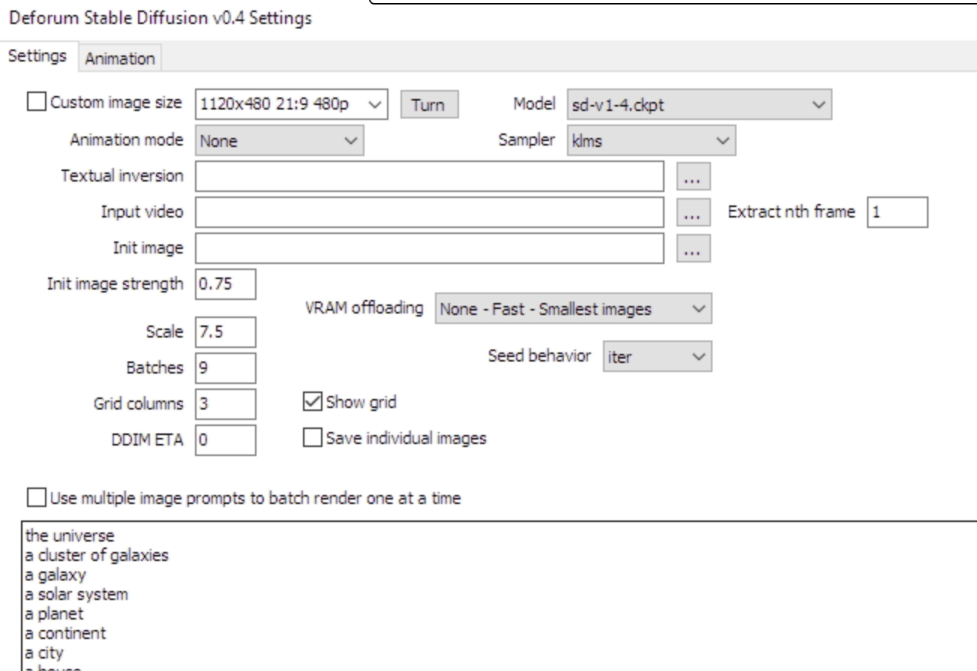
Animation Mode - If recreating examples below, use 3d
Sampler - I would use the default setting here unless you use euler_a, which may actually produce different results instead of just being slower.
Seed behavior - Since we’re using 3d animation mode, this needs to be set to random or iter not fixed. Fixed will create bloomed geometric animations.
Prompts - The prompts here do not matter for 3d animation mode from what I can see.
Continue to the animation tab.
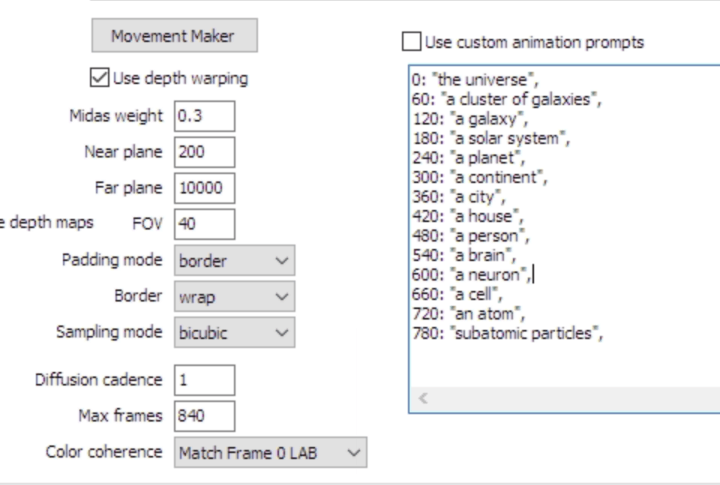
Use custom animation prompts - Here is finally where we enter our prompt. An example prompt is provided. The numbers are the frames/images that will be generated. Keep in mind the model will try to ‘reach’ the prompt image in the steps it has in-between prompts. If you give it more steps, it will have more time to mutate the image.
Movement Maker you make your prompts, click movement maker and either modify or accept the default settings. The # Key Frames are the # of prompts you have. You may want to change translation_z schedule for zooming in/out.
Now close the settings and hit generate and your frames should start being created. Once everything is done, ffmpeg will launch automatically to create your video.
Tips
- In 3D mode, the
translation_zparameter is the zoom schedule and will not be set by movement maker. - Read over the FOV and translations sections in this guide
- Use lower values in strength schedule for bigger changes in images.
- In extreme cases you may try using very low strength values for 1-5 frames to dramatically change the image before returning to a normal strength.
- Example (prompts change at 60 and 120):
0:(0.75),60:(0.5),62:(0.75),120(.55),124(.75)…
- Extend video length using FILM, DAIN, or RIFE in the Movie Interpolation menu after you generate the initial video. This can help you keep processing times down. FILM and DAIN have both produced good results for me. They all have different use cases, so check out each one.
- If you make your video too long with interpolation, use ffmpeg to double the frame rate (hopefully you started at 30fps)
- If you’re running out of VRAM, see the
VRAM offloadingsetting in the Deforum settings menu. You can also try smaller images using the custom image size dialog.- If you have to scale down your images (or even if you don’t), you can use the upscaler in the main text to image dialog and it will apply to all your frames.
Examples
All of these were made in 3d mode. I have not yet experimented with 2d mode.
Anatomy
This example I spent the most time on. Instead of just playing around with random ideas/prompts I tried to create a video I imagined in my mind. You can get the idea from the prompt below.
This example uses an advanced strength schedule referenced above in the tips, where creating the lung, heart and universe were given 40-55% strength values for 1-4 frames to encourage more dramatic transitions.
I also tried setting the prompt schedule to have duplicate prompts to encourage the model to ‘rush’ to a complete version of an object, and then continue fleshing out the idea for several more frames. This worked less well in my experience, but may be part of an ideal workflow – I don’t feel I’ve done enough testing to rule it out.
Frog
Probably the best result I had just randomly playing around. The movement maker settings are default. In this example and the one above, it seems like it would be useful to be able to specify x,y coordinates somehow where the prompt should be rendered, but I imagine that is pretty hard to pull out of a diffusion model in advance. You can likely solve this through camera work most easily.
A Man a Plan a Canal Panama
This was one of my first generations and made with mostly default settings, including all the default movement maker settings. Though the initial image may be odd the results are pretty interesting, though not totally coherent.
Short GIF(like)
I did not have great results with this but I think it could work very well if you spent some time and had the right seed range that didn’t have excessive variations. I actually created this accidentally canceling a longer generation and deciding to generate the video.
Notice the yellow flashing in one of the frames and how that breaks whatever illusion there would be. I think prompt editing instead of completely different prompts may do wonders here. I tested this at the end of this article.
Postprocessing
Built into VOC is a few movie interpolation models. All the above examples use one or a combination of these. Without the interpolation, processing time is long and reasonable fps create jerky videos in most cases I saw. Below are examples of this video processed with the different models.
DAIN
FILM
RIFE
Initial Thoughts
This seems super powerful and as I said before really delivers that wow factor again like the first time you generated a made up idea you had into an image. It doesn’t seem sufficient for really making videos and once you know what these videos look like, it’s pretty obvious when you see a video made with this process.
After glancing at the paper, the main takeaway seems to be the speed at which these generate. Again, I don’t really understand yet how this is all working, but I do notice the iterations seem to vary wildly frame to frame and depend on the amount of ‘changing’ you’re applying via the strength/prompt schedules.
I think all of my initial tests were a little too ambitious too and if you tried to make something like a moving photo all the modern mobile OSs make now, you may have better results. I also wonder what outpainting built into this kind of model could do – especially if it could be contextually aware of other frame expansions.
At this pace, it looks like in 6 months we’ll have on demand feature length films from simple prompts – and somehow maybe we’ll even get to keep some open source options too.
That’s all for now.